# Terminal-from-scratch
When your computer crashes (Windows, Linux, or macOS), you need to remember all the software installed to set them up again once you recover your OS.
This guide serves as a source of truth to encapsulate all the steps needed to set up a development environment from scratch.
## Supported Operating Systems
| Symbol | OS |
|--------|-----|
| :apple: | macOS |
| :penguin: | Linux (Debian/Ubuntu) |
| :a: | Arch Linux |
| :window: | Windows |
---
## Table of Contents
- [Google Chrome](#installing-google-chrome)
- [Fonts](#font-installation)
- [VS Code](#installing-vs-code)
- [Git](#installing-git)
- [Node.js and NPM](#installing-nodejs-and-npm)
- [Oh-My-Zsh](#installing-oh-my-zsh)
- [Neovim](#installing-neovim)
- [ZSH Plugins](#installing-zsh-plugins)
- [Powerlevel10k](#installing-powerlevel10k)
- [Ranger](#installing-ranger)
- [Terminal Emulator](#installing-terminal-emulator)
- [GNOME Extensions](#installing-gnome-extensions-linux)
- [Postman](#installing-postman)
- [DBeaver](#installing-dbeaver)
---
## Installing Google Chrome
### :apple: macOS
Using Homebrew:
```sh
brew install --cask google-chrome
```
Or download directly from [google.com/chrome](https://www.google.com/chrome/)
### :penguin: Linux (Debian/Ubuntu)
```sh
sudo apt update && sudo apt upgrade -y
sudo apt install wget
wget https://dl.google.com/linux/direct/google-chrome-stable_current_amd64.deb
sudo dpkg -i google-chrome-stable_current_amd64.deb
```
If you have errors during installation:
```sh
sudo apt-get install -f
```
### :a: Arch Linux
```sh
yay -S google-chrome
```
Or using `paru`:
```sh
paru -S google-chrome
```
### :window: Windows
Using Chocolatey:
```powershell
choco install googlechrome
```
Using winget:
```powershell
winget install Google.Chrome
```
Or download from [google.com/chrome](https://www.google.com/chrome/)
---
## Font Installation
Download MesloLGS NF (recommended for Powerlevel10k):
- [MesloLGS NF Regular.ttf](https://github.com/romkatv/powerlevel10k-media/raw/master/MesloLGS%20NF%20Regular.ttf)
- [MesloLGS NF Bold.ttf](https://github.com/romkatv/powerlevel10k-media/raw/master/MesloLGS%20NF%20Bold.ttf)
- [MesloLGS NF Italic.ttf](https://github.com/romkatv/powerlevel10k-media/raw/master/MesloLGS%20NF%20Italic.ttf)
- [MesloLGS NF Bold Italic.ttf](https://github.com/romkatv/powerlevel10k-media/raw/master/MesloLGS%20NF%20Bold%20Italic.ttf)
### :apple: macOS
Double-click each `.ttf` file and click "Install Font", or:
```sh
brew tap homebrew/cask-fonts
brew install --cask font-meslo-lg-nerd-font
```
### :penguin: Linux (Debian/Ubuntu)
```sh
mkdir -p ~/.local/share/fonts
cd ~/.local/share/fonts
wget https://github.com/romkatv/powerlevel10k-media/raw/master/MesloLGS%20NF%20Regular.ttf
wget https://github.com/romkatv/powerlevel10k-media/raw/master/MesloLGS%20NF%20Bold.ttf
wget https://github.com/romkatv/powerlevel10k-media/raw/master/MesloLGS%20NF%20Italic.ttf
wget https://github.com/romkatv/powerlevel10k-media/raw/master/MesloLGS%20NF%20Bold%20Italic.ttf
fc-cache -fv
```
### :a: Arch Linux
```sh
yay -S ttf-meslo-nerd-font-powerlevel10k
```
Or manually:
```sh
mkdir -p ~/.local/share/fonts
cd ~/.local/share/fonts
wget https://github.com/romkatv/powerlevel10k-media/raw/master/MesloLGS%20NF%20Regular.ttf
wget https://github.com/romkatv/powerlevel10k-media/raw/master/MesloLGS%20NF%20Bold.ttf
wget https://github.com/romkatv/powerlevel10k-media/raw/master/MesloLGS%20NF%20Italic.ttf
wget https://github.com/romkatv/powerlevel10k-media/raw/master/MesloLGS%20NF%20Bold%20Italic.ttf
fc-cache -fv
```
### :window: Windows
Download and double-click each `.ttf` file, then click "Install".
Or using Chocolatey:
```powershell
choco install nerd-fonts-meslo
```
---
## Installing VS Code
### :apple: macOS
```sh
brew install --cask visual-studio-code
```
### :penguin: Linux (Debian/Ubuntu)
```sh
sudo apt update
sudo apt install wget apt-transport-https
wget -qO- https://packages.microsoft.com/keys/microsoft.asc | gpg --dearmor > packages.microsoft.gpg
sudo install -D -o root -g root -m 644 packages.microsoft.gpg /etc/apt/keyrings/packages.microsoft.gpg
sudo sh -c 'echo "deb [arch=amd64,arm64,armhf signed-by=/etc/apt/keyrings/packages.microsoft.gpg] https://packages.microsoft.com/repos/code stable main" > /etc/apt/sources.list.d/vscode.list'
sudo apt update
sudo apt install code
```
### :a: Arch Linux
```sh
sudo pacman -S code
```
Or for the proprietary version:
```sh
yay -S visual-studio-code-bin
```
### :window: Windows
Using Chocolatey:
```powershell
choco install vscode
```
Using winget:
```powershell
winget install Microsoft.VisualStudioCode
```
Launch with:
```sh
code
```
---
## Installing Git
### :apple: macOS
Git comes pre-installed. To update or install:
```sh
brew install git
```
### :penguin: Linux (Debian/Ubuntu)
```sh
sudo apt install git-all
```
### :a: Arch Linux
```sh
sudo pacman -S git
```
### :window: Windows
Using Chocolatey:
```powershell
choco install git
```
Using winget:
```powershell
winget install Git.Git
```
### Verify Installation (All Platforms)
```sh
git --version
```
### Configure Git (All Platforms)
```sh
git config --global user.name "Your Name"
git config --global user.email "your.email@example.com"
```
### Set Up SSH Key (All Platforms)
Generate SSH key:
```sh
ssh-keygen -t ed25519 -C "your.email@example.com"
```
Start the SSH agent:
**macOS/Linux:**
```sh
eval "$(ssh-agent -s)"
ssh-add ~/.ssh/id_ed25519
```
**Windows (Git Bash or PowerShell):**
```powershell
Start-Service ssh-agent
ssh-add ~/.ssh/id_ed25519
```
Copy your public key:
```sh
cat ~/.ssh/id_ed25519.pub
```
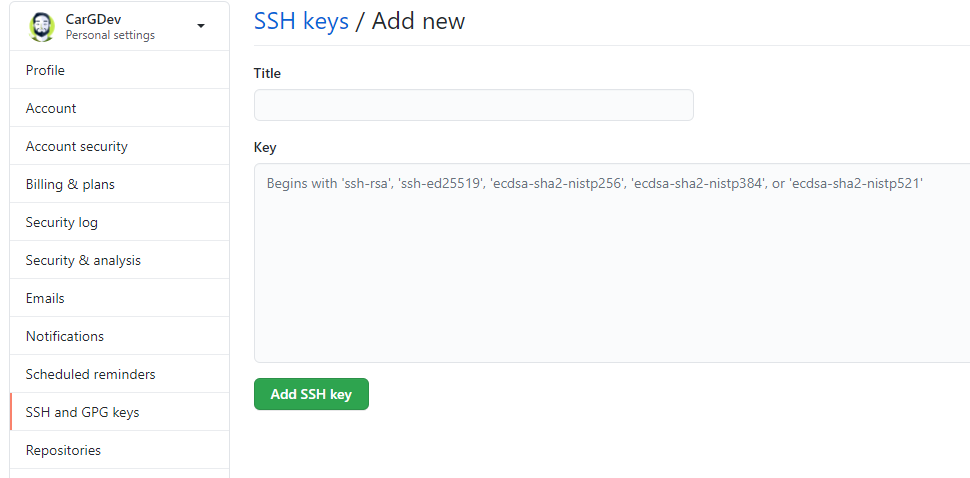
Add the key to GitHub: Go to **Account > Settings > SSH and GPG keys > New SSH Key**
---
## Installing Node.js and NPM
### :apple: macOS
Using Homebrew:
```sh
brew install node
```
Using nvm (recommended):
```sh
brew install nvm
mkdir ~/.nvm
echo 'export NVM_DIR="$HOME/.nvm"' >> ~/.zshrc
echo '[ -s "/opt/homebrew/opt/nvm/nvm.sh" ] && \. "/opt/homebrew/opt/nvm/nvm.sh"' >> ~/.zshrc
source ~/.zshrc
nvm install --lts
```
### :penguin: Linux (Debian/Ubuntu)
Using apt:
```sh
sudo apt update
sudo apt install nodejs npm
```
Using nvm (recommended):
```sh
curl -o- https://raw.githubusercontent.com/nvm-sh/nvm/v0.39.7/install.sh | bash
source ~/.bashrc
nvm install --lts
```
Using NodeSource (for specific version):
```sh
curl -fsSL https://deb.nodesource.com/setup_lts.x | sudo -E bash -
sudo apt install nodejs
```
### :a: Arch Linux
```sh
sudo pacman -S nodejs npm
```
Using nvm:
```sh
yay -S nvm
echo 'source /usr/share/nvm/init-nvm.sh' >> ~/.zshrc
source ~/.zshrc
nvm install --lts
```
### :window: Windows
Using Chocolatey:
```powershell
choco install nodejs-lts
```
Using winget:
```powershell
winget install OpenJS.NodeJS.LTS
```
Using nvm-windows:
```powershell
choco install nvm
nvm install lts
nvm use lts
```
### Verify Installation (All Platforms)
```sh
node --version
npm --version
```
---
## Installing Oh-My-Zsh
### :apple: macOS
Zsh is the default shell. Install Oh-My-Zsh:
```sh
sh -c "$(curl -fsSL https://raw.githubusercontent.com/ohmyzsh/ohmyzsh/master/tools/install.sh)"
```
### :penguin: Linux (Debian/Ubuntu)
```sh
sudo apt install zsh git curl
sh -c "$(curl -fsSL https://raw.githubusercontent.com/ohmyzsh/ohmyzsh/master/tools/install.sh)"
chsh -s $(which zsh)
```
Restart your terminal or log out and back in.
### :a: Arch Linux
```sh
sudo pacman -S zsh git curl
sh -c "$(curl -fsSL https://raw.githubusercontent.com/ohmyzsh/ohmyzsh/master/tools/install.sh)"
chsh -s $(which zsh)
```
### :window: Windows
Install Git Bash or Windows Terminal with WSL, then:
**Using WSL:**
```sh
sudo apt install zsh
sh -c "$(curl -fsSL https://raw.githubusercontent.com/ohmyzsh/ohmyzsh/master/tools/install.sh)"
chsh -s $(which zsh)
```
**Using Git Bash:**
Download Zsh from [MSYS2](https://packages.msys2.org/package/zsh) and configure Git Bash to use it.
---
## Installing Neovim
### :apple: macOS
```sh
brew install neovim
```
### :penguin: Linux (Debian/Ubuntu)
```sh
sudo add-apt-repository ppa:neovim-ppa/unstable
sudo apt update
sudo apt install neovim
```
Install clipboard support:
```sh
sudo apt install xclip xsel
```
### :a: Arch Linux
```sh
sudo pacman -S neovim xclip xsel
```
### :window: Windows
Using Chocolatey:
```powershell
choco install neovim
```
Using winget:
```powershell
winget install Neovim.Neovim
```
### Install Dependencies (All Platforms)
Python interface:
```sh
pip3 install neovim
pip3 install --upgrade neovim
```
**For :penguin: Linux / :a: Arch:**
```sh
# Ruby interface
sudo gem install neovim
```
**For :apple: macOS:**
```sh
brew install ruby
gem install neovim
```
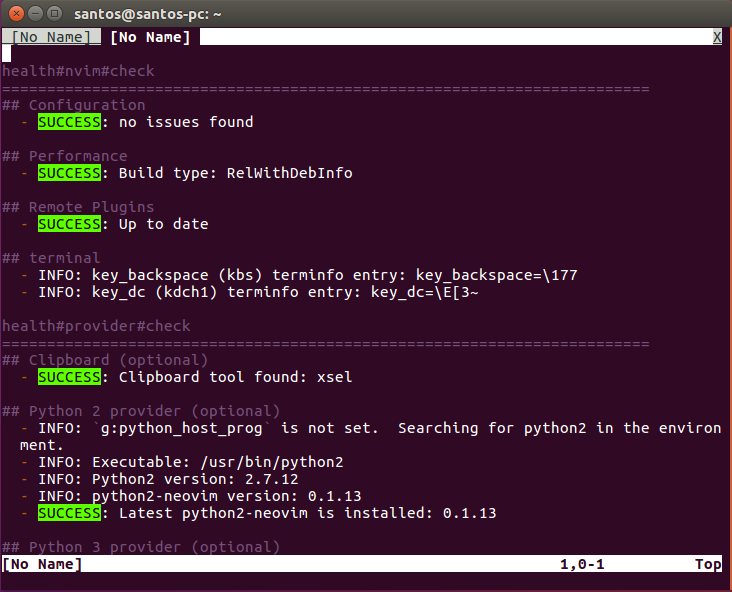
Check health:
```sh
nvim +checkhealth
```
### Install vim-plug (All Platforms)
```sh
sh -c 'curl -fLo "${XDG_DATA_HOME:-$HOME/.local/share}"/nvim/site/autoload/plug.vim --create-dirs \
https://raw.githubusercontent.com/junegunn/vim-plug/master/plug.vim'
```
**Windows (PowerShell):**
```powershell
iwr -useb https://raw.githubusercontent.com/junegunn/vim-plug/master/plug.vim |`
ni "$(@($env:XDG_DATA_HOME, $env:LOCALAPPDATA)[$null -eq $env:XDG_DATA_HOME])/nvim-data/site/autoload/plug.vim" -Force
```
 For Vim usage reference: [vimsheet.com](http://vimsheet.com/)
Check out my [VIM Repository](https://github.com/CarGDev/Vim-configuration) for my configuration.
---
## Installing ZSH Plugins
### zsh-autosuggestions
For Vim usage reference: [vimsheet.com](http://vimsheet.com/)
Check out my [VIM Repository](https://github.com/CarGDev/Vim-configuration) for my configuration.
---
## Installing ZSH Plugins
### zsh-autosuggestions
 **All Platforms (with Oh-My-Zsh):**
Clone the repository:
```sh
git clone https://github.com/zsh-users/zsh-autosuggestions ${ZSH_CUSTOM:-~/.oh-my-zsh/custom}/plugins/zsh-autosuggestions
```
Add to `~/.zshrc`:
```sh
plugins=(... zsh-autosuggestions)
```
### zsh-syntax-highlighting
**All Platforms (with Oh-My-Zsh):**
Clone the repository:
```sh
git clone https://github.com/zsh-users/zsh-syntax-highlighting.git ${ZSH_CUSTOM:-~/.oh-my-zsh/custom}/plugins/zsh-syntax-highlighting
```
Add to `~/.zshrc`:
```sh
plugins=(... zsh-syntax-highlighting)
```
Restart your terminal.
---
## Installing Powerlevel10k
**All Platforms (with Oh-My-Zsh):**
```sh
git clone --depth=1 https://github.com/romkatv/powerlevel10k.git ${ZSH_CUSTOM:-$HOME/.oh-my-zsh/custom}/themes/powerlevel10k
```
Set `ZSH_THEME="powerlevel10k/powerlevel10k"` in `~/.zshrc`.
Restart your terminal and follow the configuration wizard.
**Note:** For full icon support, use the [MesloLGS NF font](#font-installation).
---
## Installing Ranger
### :apple: macOS
```sh
brew install ranger
```
### :penguin: Linux (Debian/Ubuntu)
```sh
sudo apt install ranger
```
Or from source:
```sh
git clone https://github.com/ranger/ranger.git
cd ranger
sudo make install
```
### :a: Arch Linux
```sh
sudo pacman -S ranger
```
### :window: Windows
Ranger is primarily for Unix systems. Use WSL for Windows.
### Configuration (All Platforms)
```sh
ranger --copy-config=all
```
Config files are located at `~/.config/ranger/`
### Install Colorschemes
```sh
cd ~/.config/ranger
git clone https://github.com/ranger/colorschemes.git
```
---
## Installing Terminal Emulator
### :apple: macOS
**iTerm2 (recommended):**
```sh
brew install --cask iterm2
```
**Alacritty:**
```sh
brew install --cask alacritty
```
**Kitty:**
```sh
brew install --cask kitty
```
### :penguin: Linux (Debian/Ubuntu)
**Terminator:**
```sh
sudo apt install terminator
```
**Alacritty:**
```sh
sudo add-apt-repository ppa:aslatter/ppa
sudo apt update
sudo apt install alacritty
```
**Kitty:**
```sh
sudo apt install kitty
```
### :a: Arch Linux
**Alacritty:**
```sh
sudo pacman -S alacritty
```
**Kitty:**
```sh
sudo pacman -S kitty
```
**Terminator:**
```sh
sudo pacman -S terminator
```
### :window: Windows
**Windows Terminal (recommended):**
```powershell
winget install Microsoft.WindowsTerminal
```
**Alacritty:**
```powershell
choco install alacritty
```
---
## Installing GNOME Extensions (Linux)
### :penguin: Linux (Debian/Ubuntu)
```sh
sudo apt update && sudo apt upgrade
sudo apt install gnome-shell-extensions chrome-gnome-shell
```
### :a: Arch Linux
```sh
sudo pacman -S gnome-shell-extensions
yay -S chrome-gnome-shell
```
### Recommended Extensions
- [Dash to Dock](https://extensions.gnome.org/extension/307/dash-to-dock/)
- [Arc Menu](https://extensions.gnome.org/extension/3628/arcmenu/)
- [Transparent Top Bar](https://extensions.gnome.org/extension/3960/transparent-top-bar-adjustable-transparency/)
Browse more at [extensions.gnome.org](https://extensions.gnome.org/)
---
## Installing Postman
### :apple: macOS
```sh
brew install --cask postman
```
### :penguin: Linux (Debian/Ubuntu)
```sh
sudo snap install postman
```
Or using Flatpak:
```sh
flatpak install flathub com.getpostman.Postman
```
### :a: Arch Linux
```sh
yay -S postman-bin
```
### :window: Windows
Using Chocolatey:
```powershell
choco install postman
```
Using winget:
```powershell
winget install Postman.Postman
```
---
## Installing DBeaver
### :apple: macOS
```sh
brew install --cask dbeaver-community
```
### :penguin: Linux (Debian/Ubuntu)
```sh
wget -O - https://dbeaver.io/debs/dbeaver.gpg.key | sudo apt-key add -
echo "deb https://dbeaver.io/debs/dbeaver-ce /" | sudo tee /etc/apt/sources.list.d/dbeaver.list
sudo apt update
sudo apt install dbeaver-ce
```
Or using Snap:
```sh
sudo snap install dbeaver-ce
```
### :a: Arch Linux
```sh
sudo pacman -S dbeaver
```
### :window: Windows
Using Chocolatey:
```powershell
choco install dbeaver
```
Using winget:
```powershell
winget install dbeaver.dbeaver
```
---
## Quick Reference - Package Managers
| OS | Package Manager | Install Command |
|----|-----------------|-----------------|
| :apple: macOS | Homebrew | `/bin/bash -c "$(curl -fsSL https://raw.githubusercontent.com/Homebrew/install/HEAD/install.sh)"` |
| :penguin: Debian/Ubuntu | apt | Pre-installed |
| :a: Arch Linux | pacman/yay | `sudo pacman -S yay` or install from AUR |
| :window: Windows | Chocolatey | `Set-ExecutionPolicy Bypass -Scope Process -Force; [System.Net.ServicePointManager]::SecurityProtocol = [System.Net.ServicePointManager]::SecurityProtocol -bor 3072; iex ((New-Object System.Net.WebClient).DownloadString('https://community.chocolatey.org/install.ps1'))` |
| :window: Windows | winget | Pre-installed on Windows 11 / Available via Microsoft Store |
---
## License
See [LICENSE](./LICENSE) for details.
**All Platforms (with Oh-My-Zsh):**
Clone the repository:
```sh
git clone https://github.com/zsh-users/zsh-autosuggestions ${ZSH_CUSTOM:-~/.oh-my-zsh/custom}/plugins/zsh-autosuggestions
```
Add to `~/.zshrc`:
```sh
plugins=(... zsh-autosuggestions)
```
### zsh-syntax-highlighting
**All Platforms (with Oh-My-Zsh):**
Clone the repository:
```sh
git clone https://github.com/zsh-users/zsh-syntax-highlighting.git ${ZSH_CUSTOM:-~/.oh-my-zsh/custom}/plugins/zsh-syntax-highlighting
```
Add to `~/.zshrc`:
```sh
plugins=(... zsh-syntax-highlighting)
```
Restart your terminal.
---
## Installing Powerlevel10k
**All Platforms (with Oh-My-Zsh):**
```sh
git clone --depth=1 https://github.com/romkatv/powerlevel10k.git ${ZSH_CUSTOM:-$HOME/.oh-my-zsh/custom}/themes/powerlevel10k
```
Set `ZSH_THEME="powerlevel10k/powerlevel10k"` in `~/.zshrc`.
Restart your terminal and follow the configuration wizard.
**Note:** For full icon support, use the [MesloLGS NF font](#font-installation).
---
## Installing Ranger
### :apple: macOS
```sh
brew install ranger
```
### :penguin: Linux (Debian/Ubuntu)
```sh
sudo apt install ranger
```
Or from source:
```sh
git clone https://github.com/ranger/ranger.git
cd ranger
sudo make install
```
### :a: Arch Linux
```sh
sudo pacman -S ranger
```
### :window: Windows
Ranger is primarily for Unix systems. Use WSL for Windows.
### Configuration (All Platforms)
```sh
ranger --copy-config=all
```
Config files are located at `~/.config/ranger/`
### Install Colorschemes
```sh
cd ~/.config/ranger
git clone https://github.com/ranger/colorschemes.git
```
---
## Installing Terminal Emulator
### :apple: macOS
**iTerm2 (recommended):**
```sh
brew install --cask iterm2
```
**Alacritty:**
```sh
brew install --cask alacritty
```
**Kitty:**
```sh
brew install --cask kitty
```
### :penguin: Linux (Debian/Ubuntu)
**Terminator:**
```sh
sudo apt install terminator
```
**Alacritty:**
```sh
sudo add-apt-repository ppa:aslatter/ppa
sudo apt update
sudo apt install alacritty
```
**Kitty:**
```sh
sudo apt install kitty
```
### :a: Arch Linux
**Alacritty:**
```sh
sudo pacman -S alacritty
```
**Kitty:**
```sh
sudo pacman -S kitty
```
**Terminator:**
```sh
sudo pacman -S terminator
```
### :window: Windows
**Windows Terminal (recommended):**
```powershell
winget install Microsoft.WindowsTerminal
```
**Alacritty:**
```powershell
choco install alacritty
```
---
## Installing GNOME Extensions (Linux)
### :penguin: Linux (Debian/Ubuntu)
```sh
sudo apt update && sudo apt upgrade
sudo apt install gnome-shell-extensions chrome-gnome-shell
```
### :a: Arch Linux
```sh
sudo pacman -S gnome-shell-extensions
yay -S chrome-gnome-shell
```
### Recommended Extensions
- [Dash to Dock](https://extensions.gnome.org/extension/307/dash-to-dock/)
- [Arc Menu](https://extensions.gnome.org/extension/3628/arcmenu/)
- [Transparent Top Bar](https://extensions.gnome.org/extension/3960/transparent-top-bar-adjustable-transparency/)
Browse more at [extensions.gnome.org](https://extensions.gnome.org/)
---
## Installing Postman
### :apple: macOS
```sh
brew install --cask postman
```
### :penguin: Linux (Debian/Ubuntu)
```sh
sudo snap install postman
```
Or using Flatpak:
```sh
flatpak install flathub com.getpostman.Postman
```
### :a: Arch Linux
```sh
yay -S postman-bin
```
### :window: Windows
Using Chocolatey:
```powershell
choco install postman
```
Using winget:
```powershell
winget install Postman.Postman
```
---
## Installing DBeaver
### :apple: macOS
```sh
brew install --cask dbeaver-community
```
### :penguin: Linux (Debian/Ubuntu)
```sh
wget -O - https://dbeaver.io/debs/dbeaver.gpg.key | sudo apt-key add -
echo "deb https://dbeaver.io/debs/dbeaver-ce /" | sudo tee /etc/apt/sources.list.d/dbeaver.list
sudo apt update
sudo apt install dbeaver-ce
```
Or using Snap:
```sh
sudo snap install dbeaver-ce
```
### :a: Arch Linux
```sh
sudo pacman -S dbeaver
```
### :window: Windows
Using Chocolatey:
```powershell
choco install dbeaver
```
Using winget:
```powershell
winget install dbeaver.dbeaver
```
---
## Quick Reference - Package Managers
| OS | Package Manager | Install Command |
|----|-----------------|-----------------|
| :apple: macOS | Homebrew | `/bin/bash -c "$(curl -fsSL https://raw.githubusercontent.com/Homebrew/install/HEAD/install.sh)"` |
| :penguin: Debian/Ubuntu | apt | Pre-installed |
| :a: Arch Linux | pacman/yay | `sudo pacman -S yay` or install from AUR |
| :window: Windows | Chocolatey | `Set-ExecutionPolicy Bypass -Scope Process -Force; [System.Net.ServicePointManager]::SecurityProtocol = [System.Net.ServicePointManager]::SecurityProtocol -bor 3072; iex ((New-Object System.Net.WebClient).DownloadString('https://community.chocolatey.org/install.ps1'))` |
| :window: Windows | winget | Pre-installed on Windows 11 / Available via Microsoft Store |
---
## License
See [LICENSE](./LICENSE) for details.